
ども。とうきび。です。
自由に(安く)ブログを書きたいので、Wordpressの世界を飛び出して、Bloggerへ!
世の中の流れとは完全に逆行しておりますが、そんなの気にしないもーん。
そうこの記事は、Bloggerテーマ「ZELO」のカスタマイズ記録です。
今日は、「目次の自動表示」。


でもそもそものね、ワードプレスで使ってた目次デザインはこんなのだったのです。

これに近づけるのがひとまずの目標!
HTMLの
<style type="text/css">…</style>
の中にいろいろ入れてデザイン変更するみたいです!!


自由に(安く)ブログを書きたいので、Wordpressの世界を飛び出して、Bloggerへ!
世の中の流れとは完全に逆行しておりますが、そんなの気にしないもーん。
そうこの記事は、Bloggerテーマ「ZELO」のカスタマイズ記録です。
今日は、「目次の自動表示」。
ビフォーアフター
ビフォー

アフター

Bloggerテーマ「ZELO」で目次を自動表示させるカスタマイズ
今回参考にさせてもらったのはZELOの製作者ヒロさんの公式サイトではなく、下記のもの。
①HTMLを編集
※かならずバックアップをとってからカスタマイズしてください。
(1-1)HTMLをひらく
テーマ
→ 「・」がたてに3つ並んでいるメニューを選択
→ 「HTMLを編集」
(1-2)</head>をさがす
(1-3)</head>のすぐ上に、下記のコードを追加
<!-- [START] 目次作成プラグイン-->
<b:if cond='data:blog.pageType == "item"'>
<script>
//以下のオプションを好みに合わせて変更して下さい
//オプションの詳しい説明は、(https://www.sukerou.com/2018/10/blogger-table-of-contents-javascript.html)を参照
var toc_options = {
target: ["h2", "h3",],
autoNumber: false,
condTargetCount: 3,
insertPosition: "firstHeadBefore",
showToc: true,
width: "auto",
marginTop: "20px",
marginBottom: "20px",
indent: "0px",
postBodySelector: ".widget.Blog"
};
//これ以降のソースは編集しないでください
(function(i){var j=0;document.addEventListener("DOMContentLoaded",function(){var p=document.querySelector(toc_options.postBodySelector);if(p==null||typeof p==="undefined"){reutrn}if(toc_options.target.length==0){return}rootContent=h(toc_options,p);if(rootContent.children.length>=toc_options.condTargetCount){var q=c(rootContent);o(q)}});function h(q,p){var u=q.target.length;var t=function(E,D,w){var z=q.target[E];var x=E<u-1?q.target[E+1]:"";var y="toc_headline_"+(++j);var F=g(z,m(D),E+1,y);w.children.push(F);D.id=y;var A=f(D);if(x==""){return}while(true){if(A==null||typeof A==="undefined"){break}if(b(A)==z){break}if(b(A)==x){t(E+1,A,F)}else{var B=A.getElementsByTagName(x);for(var C=0;C<B.length;C++){t(E+1,B[C],F)}}var A=f(A)}};var r=g("ROOT","",0);var v=p.getElementsByTagName(q.target[0]);for(var s=0;s<v.length;s++){t(0,v[s],r,"")}return r}function c(s){var r=document.createElement("div");r.classList.add("b-toc-container");r.style.marginTop=toc_options.marginTop;r.style.marginBottom=toc_options.marginTop;if(toc_options.width=="100%"){r.style.display="block"}else{r.style.width=toc_options.width}var q=document.createElement("p");var w=document.createElement("span");var v=document.createElement("span");var u=document.createElement("span");v.classList.add("b-toc-show-wrap");u.classList.add("b-toc-show-wrap");var y=document.createElement("a");w.innerText="目次";v.innerText="[";u.innerText="]";y.href="javascript:void(0);";q.appendChild(w);q.appendChild(v);q.appendChild(y);q.appendChild(u);var t=function(z){var p=typeof z==="boolean"?z:e(r,"hide");if(p){y.innerText="非表示";r.classList.remove("hide")}else{y.innerText="表示";r.classList.add("hide")}};y.addEventListener("click",t);t(toc_options.showToc);var x=document.createElement("ul");s.children.forEach(function(z,p){n(x,z,(p+1)+"")});r.appendChild(q);r.appendChild(x);return r}function n(s,u,w){var p=document.createElement("li");var q=document.createElement("a");p.style.paddingLeft=toc_options.indent;q.href="#"+u.id;if(toc_options.autoNumber){var t=document.createElement("span");t.classList.add("toc-number");t.innerText=w}var v=document.createElement("span");v.classList.add("toc-text");v.innerText=u.text;if(toc_options.autoNumber){q.appendChild(t)}q.appendChild(v);p.appendChild(q);s.appendChild(p);if(u.children.length>0){var r=document.createElement("ul");p.appendChild(r);u.children.forEach(function(y,x){n(r,y,w+"."+(x+1))})}}function o(q){var r=null;var p=document.querySelector(toc_options.postBodySelector);if(toc_options.insertPosition=="firstHeadBefore"||toc_options.insertPosition=="firstHeadAfter"){r=p.querySelector(toc_options.target[0])}else{if(toc_options.insertPosition=="top"){r=p}}if(r==null){return}if(toc_options.insertPosition=="firstHeadBefore"){k(r,q)}else{if(toc_options.insertPosition=="firstHeadAfter"){a(r,q)}else{if(toc_options.insertPosition=="top"){k(r,q)}}}}function g(q,r,p,s){return{tagName:q,text:r,children:[],nestLevel:p,id:s}}function m(p){return p.innerText}function f(p){return p.nextElementSibling}function d(p){return p.previousElementSibling}function b(p){return p.tagName.toLowerCase()}function e(p,q){return p.classList.contains(q)}function l(p){return p.parentNode}function a(q,s){var r=l(q);var p=f(q);if(r!=null&&p!=null){r.insertBefore(s,p)}}function k(p,r){var q=l(p);if(q!=null){q.insertBefore(r,p)}}})(window);
</script>
<style type="text/css">
.b-toc-container{background:#f9f9f9;border:1px solid #aaa;padding:10px;margin-bottom:1em;width:auto;display:table;font-size:95%}.b-toc-container p{text-align:center;margin:0;padding:0}.b-toc-container ul{list-style-type:none;list-style:none;margin:0;padding:0}.b-toc-container>ul{margin:15px 0 0}.b-toc-container.hide>ul{display:none}.b-toc-container ul li{margin:0;padding:0 0 0 20px;list-style:none}.b-toc-container ul li:after,.b-toc-container ul li:before{background:0;border-radius:0;content:""}.b-toc-container ul li a{text-decoration:none;color:#008db7!important;font-weight:400}.b-toc-container ul li .toc-number{margin:0 .5em 0 0}.b-toc-container ul li .toc-text:hover{text-decoration:underline}
</style>
</b:if>
<!-- [END] 目次作成プラグイン-->
(1-4)保存
②目次のデザインを変更
上記のコードを足しただけだと、デフォルトデザインのこの状態↓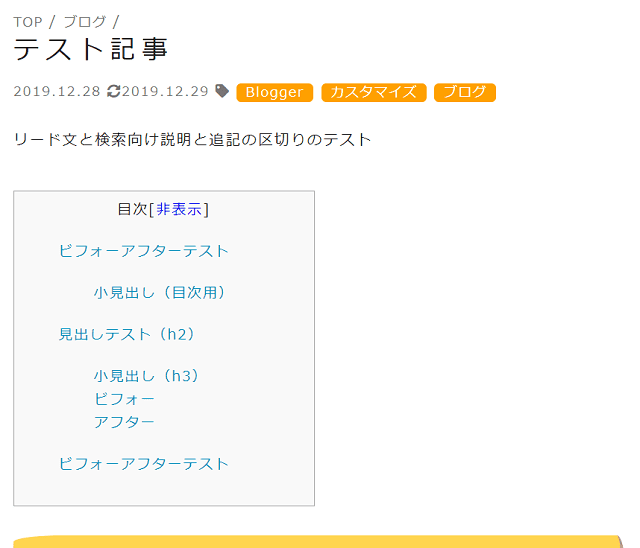
でもそもそものね、ワードプレスで使ってた目次デザインはこんなのだったのです。

これに近づけるのがひとまずの目標!
HTMLの
<style type="text/css">…</style>
の中にいろいろ入れてデザイン変更するみたいです!!
(2-1)中央寄せと、背景と、枠線と
- 目次を記事スペースの中央寄せにして、
- 背景色をちょっとだけつけて、
- 枠線をテーマカラーにして、
- 余白を調整
するカスタマイズ!
<style type='text/css'>
.b-toc-container{
margin: 1.5em auto;
background:rgba(255,248,225, 0.2);
border: 3px solid #FFD54F;
padding:1px;
margin-bottom:1em;
width:auto;
display:table;
font-size:1em
}
(略)
</style>
(2-2)フォントカラーを変更
フォントカラーがちょっと青っぽいのが気になるから、本文のテキストカラーと同じ色に変更!
<style type='text/css'>
(略)
.b-toc-container ul li a{
text-decoration:none;
color:#212121!important;
font-weight:400
}
(略)
</style>
(2-3)「目次」の文字をちょっと大きくする
- 「目次」の文字だけ少し大きくして、
- 枠線の上との余白を持たせる
デザインを目指します!
<style type='text/css'>
(略)
.b-toc-container p{
text-align:center;
margin:0;
padding:20px 0 0 0;
font-size:1.1em
}
text-align:center;
margin:0;
padding:20px 0 0 0;
font-size:1.1em
}
(略)
</style>
(2-4)「目次」タイトル前にアイコンを表示
Font Awesome 5アイコンを使います。
<style type='text/css'>
(略:わたしは上記「目次」の指定の直下に置いてます)
.b-toc-container p::before{
font-family: "Font Awesome 5 Free";
content: '\f0ca';
font-weight: 900;
margin-right: .5em;
}
(略)
</style>
③リンク先タイトルとナビゲーションバーが重ならないようにする
このままだと、「目次」のリンクを踏んで該当箇所にジャンプしたときに、

こう↑なっちゃうのです。
「ZELO」を使っていると思われるブログ、結構そのままのサイトが多かったよ。
なんと「OrangeZELO」以降の公式目次でも、ジャンプ位置の修正はされていない模様。
・・・みんなそんなに気にならないってことかな?
わたしは気になるので、ジャンプ設定の修正。
いろんな方法があるみたいですが、一番シンプルで機能したのがこれでした↓
<style type='text/css'>
(略)
html {
scroll-padding-top: 60px; /* 固定ヘッダの高さ分 */
}
</style>
赤字の部分を追加しただけ!で、こうなりました↓

満足満足。
「ZELO」に目次機能を追加したはなし
狙い通りのデザインとジャンプ位置の調整ができました!
でも、「OrangeZELO」「Prime ZELO」デフォルトの目次デザインもシンプルですてき・・・。
ひとまず今日はここまで~ノシ


0 件のコメント :
コメントを投稿